- T5 torx driver
- x-acto or sharp pointed device
- paper cup (for small parts)
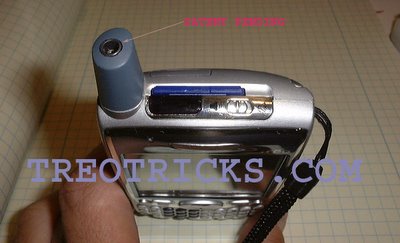
After removing all the screws, remove the antenna by pulling it straight out. Next up is the hardest step... spliting both halves of the case!
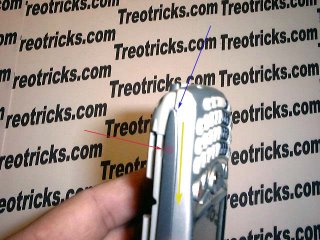
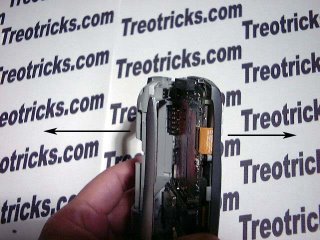
Start by holding the treo as shown below, work on separating the side that does not have the antenna. Place your left thumb where the red dot is and squeeze in. The front half of the case needs to be "pryed out" to unclip it from the other half. this is done by inserting your right thumbnail in between the halves (blue arrow) and running it down the split forcefully but slowly (yellow arrow).
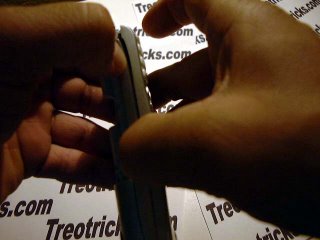
Once you have progressed far enough along, it should look like the picture below.
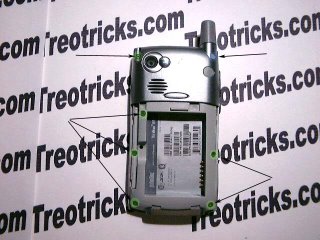
Once you have that side split, go ahead and separate both edges by opening it up like a book... but do it very carfully and you should be able to unsnap and split the other side. As you can see from the picture below, the electronics and screen stay with the front half, and the rear half separates with the side chrome pieces
That is it to opening up your Treo. The next how-to's will show how to rubberize the chrome side pieces, add a lanyard, an internal impedance fix hack, and to add a 3.5mm audio out jack up top... cool!!!
posted by TreoTricks at 8:07 PM
![]()
![]()


15 Comments:
looking forward to the 3.5" jack writeup!
Great tricks!
Please consider posting larger photos -- possibly linked to the existing ones.
Great projects, can you tell me what kind or brand of jack you used for the inside of the antenna. I have looked at mine and it looks like it may help to use the specific jack that you used. Thanks for posting your tips for all to see.
I've used your instructions to open the trio 650 to replace the screen. This is literally the only place I could find this info. Thank you very much. A word of caution to others doing this. Open the case VERY SLOWLY. There is a metal shield and round foam ring around the camera assembly which will pop out. It in not held in place by anything other that the case being closed. I attempted to reassemble with the shield and ring in several different positions. End result was breaking the camera off the curcuit board. Additional longer term effect is that the battery depleats much quicker than before and the phone heats up. (obvious short in there somewhere) Heat is from general locatin of camera unit. All other phone, web, email, and the new screen, work fine. Thanks for the info - just heed the additioal cautions.
I too have to work on a Treo 650 soon. Thanks for the blog. Was wondering where to get some tork screws and drive? Any idea.
Please email me at gfish123@email.com.
thanks for directions. I was able to use the tiny sunglass screwdriver on my swiss knife instead of the tork specialized ones. They aren't screwed in too tight fortunately, but putting them back, i didn't get as tight a result as before i started.
Where can I get a new faceplate for my Treo 650???
Where can I get a new faceplate for my Treo 650???
My keypad isn't functioning...but everything else works from the touch screen. If I open this up, will there be a way to fix it?
michael.carroll@comcast.net
Harbor Freight Tools has a precision screwdriver set, part number 93916, with the correct driver bit. It was $6.00 on sale, reg price is $10 I think. www.harborfreight.com
My replacement case came from Ebay, from a reseller, Edge cellular in Northbrook, Il.
Still looking for a source on the torx screws, though.
Great instructions. I just disassembled my 650 and replaced the badly beat up metallic-look buttons and d-pad. I found all parts for this (including torx driver and extra screws that somebody was looking for) at this site:
http://www.performancepda.com/
(No affiliation with them). I was impressed. They shipped quickly and everything was right in my order. The part is indistinguishable from what came with the phone, except it's not all beat up. :)
I'm irrationally happy to have fixed this purely cosmetic issue, but it'd been bugging me for months, and now my 650 looks basically new again.
Parts like screws etc can be ordered @ www.pdaparts.com. I used them a long time ago for my palm iiic and they now carry treo parts
Look at Lowes.com for their Kobalt 8-in-1 torx screwdriver set for $5.95. Head over to the local model train / hobby store for some 1/4" 1-72 screws, available in a variety of heads (flat, phillips, etc.) I got a pack of 5 for $2.20. Same day service too!
If you replace the screen on your Treo and the new screen won't "light up", the ribbon cable to the new display is not tightly snapped into the cable connector. Take a pair of tweezers, open the cable connector and push the display ribbon cable into the display connector until it snaps in all the way. Some ribbon cables have 2 white lines on them indicating that the ribbon cable should go in far enough so the white lines line up with the edge of the connector. Once you have the cable tightly connected, the screen will work like a charm.
Locked-up keyboard solution:
If one key is stuck down (no longer clicks) it will lock up all the other keys. Press all keys until you locate a non-clicker. Another web-site has instructions to disassemble down to the keyboard contact module, peel the foil back, re-cone the non-clicker, and reassemble. WORKED FOR ME!
Post a Comment
<< Home